As the digital asset landscape continues to expand, the need for scalable and efficient blockchain solutions becomes increasingly critical. Polygon is a pioneering platform designed to enhance and transform Ethereum’s capabilities by providing faster and more economical transactions. Known as a Layer 2 scaling solution and sidechain, Polygon allows for the creation of interconnected blockchain networks while maintaining the robust security and versatility of Ethereum. Its integration with MetaMask, a leading Ethereum wallet, empowers users with the ability to easily manage their assets across both ecosystems. This guide aims to demystify the process of adding Polygon to your MetaMask wallet, providing you with a gateway to a more versatile and cost-effective blockchain experience. In this guide, we’ll walk you through the steps to seamlessly integrate Polygon into your MetaMask wallet.
POLYGON NETWORK INFORMATION
- Network Name: Polygon Mainnet
- RPC URL: https://polygon-rpc.com/
- Chain ID: 137
- Currency Symbol: MATIC
- Block Explorer URL (Optional): https://polygonscan.com/
How to Add Polygon to MetaMask
In the rapidly expanding universe of cryptocurrencies, the integration of different blockchain networks with your digital wallet is not just a convenience, it’s a necessity. Here is how to add Polygon to your MetaMask wallet, covering both automatic and manual methods, as well as the process for mobile users.
Adding Polygon to MetaMask Automatically Using Polygonscan
Adding Polygon to MetaMask can be done automatically through Polygonscan, a block explorer for Polygon. This method simplifies the process significantly:
1. Navigate to Polygonscan: Go to Polygonscan. At the bottom of the page, you’ll find the “Add Polygon Network” button, which includes a MetaMask icon.

2. Approve connection: Clicking this will prompt a MetaMask notification asking for permission to add the Polygon Network. Confirm the action.
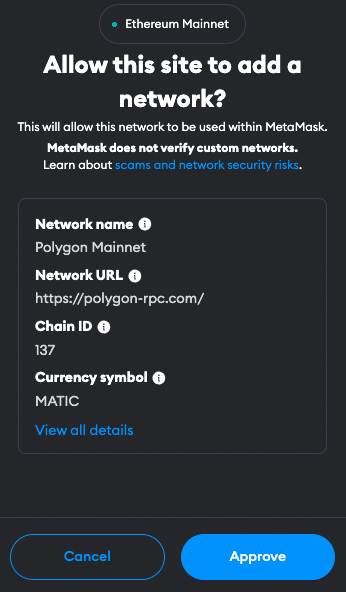
3. Switch the network: MetaMask will automatically fill in all the necessary network details. You can now switch the network.
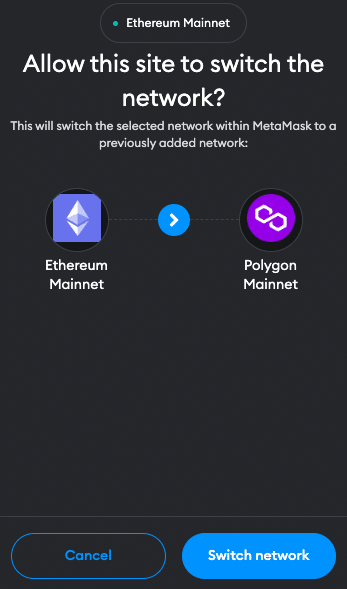
Adding Polygon to MetaMask Manually Using the Polygon Address
If you prefer a manual approach or encounter issues with the automatic method, adding Polygon to MetaMask is straightforward. Follow these steps:
1. Open MetaMask: Click on the MetaMask extension in your browser.
2. Open menu: At the top of the app, you will see the current network (usually Ethereum Mainnet by default). Click on it to open a dropdown menu and select “Add Network”.
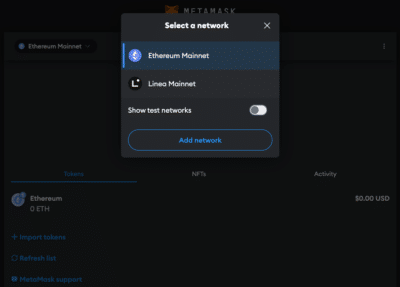
3. Select Network: Search for Polygon Mainnet on the list and click “Add”. Check the network details on the screen and click “Approve”.

Alternative: Instead of adding Polygon from the list you can also click on “Add a network manually” at the bottom of the page. Proceed as follows:
4. Enter Network Details: In the new screen, enter the Polygon network details as follows:
- Network Name: Polygon Mainnet
- RPC URL: https://polygon-rpc.com/
- Chain ID: 137
- Currency Symbol: MATIC
- Block Explorer URL (Optional): https://polygonscan.com/
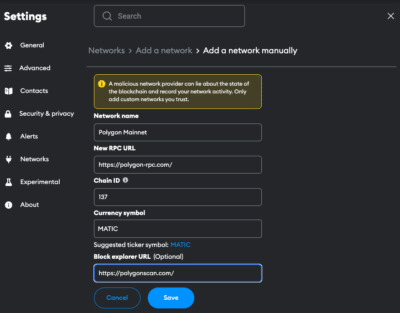
5. Save and Use: Click “Save” to add the network.
Adding Polygon to the MetaMask Mobile App
Adding Polygon to the MetaMask mobile app involves a similar process to the desktop version:
1. Open MetaMask App: Launch the MetaMask app on your mobile device.
2. Open menu: Tap on the network dropdown menu at the top of your screen and select “add network”.
3. Select Network: Search for Polygon Mainnet on the list and click “Add”. Check the network details on the screen and click “Approve”.
Alternative: Instead of adding Polygon from the list you can also click on “custom networks”. Proceed as follows:
4. Enter Network Details: In the new screen, enter the Polygon details as follows:
- Network Name: Polygon Mainnet
- RPC URL: https://polygon-rpc.com/
- Chain ID: 137
- Currency Symbol: MATIC
- Block Explorer URL (Optional): https://polygonscan.com/
5. Add and Switch: Add the network.
Add Polygon Testnet Information to MetaMask
For developers or users interested in testing, adding Polygon’s Mumbai-Testnet to MetaMask is beneficial:
1. Open MetaMask and Add Network: Follow the initial steps as described in the manual addition of Polygon.
2. Details for the Mumbai Testnet:
- Network name: Matic Mumbai
- RPC URL: https://rpc-mumbai.maticvigil.com/
- Chain ID: 80001
- Currency symbol: MATIC
- Block explorer URL: https://mumbai.polygonscan.com/
3. Save and Switch: Save the settings to add the Polygon Testnet to your MetaMask.
Import Polygon Tokens Into MetaMask
In order for the tokens to be visible in the MetaMask, they must first be added. Polygon tokens are the equivalent of native ERC-20 tokens on Ethereum and represent a variety of assets and utilities within the Polygon ecosystem. Here’s how you can import Polygon tokens into your MetaMask wallet:
1. Access Your Wallet: Open MetaMask and ensure you’re on the Polygon network.
2. Find Token Contract Address: Locate the contract address of the Polygon token you want to add. This can usually be found on the project’s website or on Polygonscan.
3. Add Token in MetaMask: Click on “Import tokens” at the bottom of the main MetaMask screen.
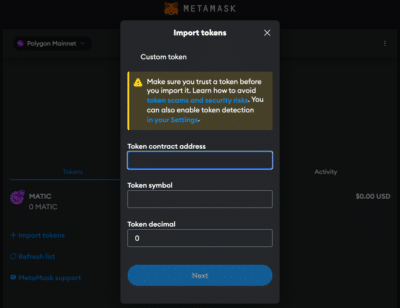
4. Enter Token Details: Paste the token’s contract address into the “Token contract address” field. The other fields should automatically fill in.
5. Complete the Addition: Click “Next” and “Import”. The Polygon token will now appear in your wallet.
Alternative: Visit Coinmarketcap or Coingecko and find the token you want to add. Click on the MetaMask icon and the token will be added to your Wallet. You can also copy the contract address and proceed as described above.
Why use the Polygon Network?
The Polygon network as a layer 2 and sidechain solution offers some advantages over Ethereum:
- Lower Transaction Fees: Polygon’s architecture significantly reduces transaction costs compared to Ethereum’s mainnet, making it an economical choice for users looking to perform frequent transactions or interact with decentralized applications (dApps).
- Faster Transactions: Thanks to its unique structure, transactions on Polygon are processed much quicker than on the Ethereum mainnet, providing a smoother and more efficient user experience.
- Ecosystem Access: Adding Polygon to your MetaMask wallet grants you access to a vast and growing ecosystem of dApps, DeFi platforms, and innovative tokens, many of which are exclusive to the Polygon network.
- Enhanced Scalability: Polygon addresses some of the fundamental scalability issues faced by the Ethereum network. By facilitating a multi-chain ecosystem, it allows for a significant increase in the number of transactions per second (TPS), making the network more scalable and accommodating for a growing number of users and applications.
- Eco-friendly Options: Polygon is committed to becoming carbon neutral and eventually carbon negative. By optimizing transaction efficiency and pledging to invest in environmental initiatives, Polygon presents an eco-friendlier alternative for users conscious about the environmental impact of their blockchain activities.
Jump Start for MetaMask CHANGE
Ensure your MetaMask wallet is set up to add the Polygon network. If you haven’t installed MetaMask yet, follow these steps to do so.
Install MetaMask
Before adding the Polygon network to your wallet, the first step is to install MetaMask. MetaMask is a popular Ethereum wallet that can be used as a browser extension or a mobile app, providing an easy and secure way to interact with the Ethereum blockchain and its Layer 2 solutions, like Polygon. Here’s how you can install MetaMask:
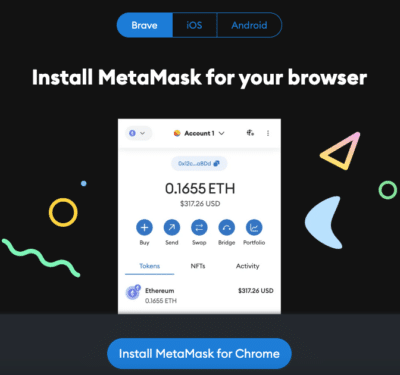
1. Download MetaMask: Visit the official MetaMask website (metamask.io) and download the MetaMask extension for your preferred browser (Chrome, Firefox, Edge, Brave or Opera). Install and follow the prompts to add the MetaMask extension to your browser.
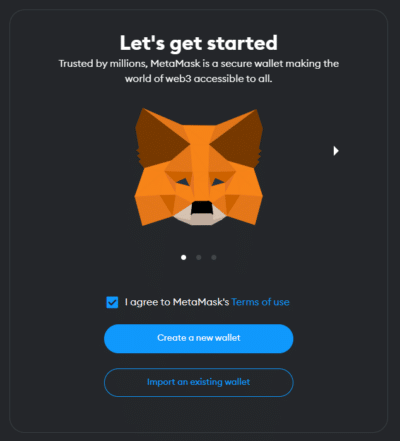
2. Create a Wallet: After installation, open the MetaMask extension and select “Create a Wallet”. Follow the instructions to set up your wallet.
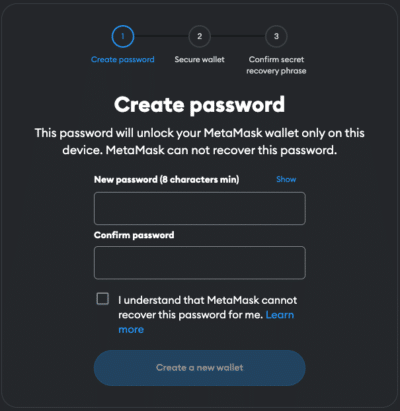
3. Create password: Create a secure password. Password managers can help you to create unique and secure passwords.
4. Secure Your Wallet: Write down your recovery phrase and store it in a secure location. This phrase is essential for recovering your wallet if you forget your password or change devices.
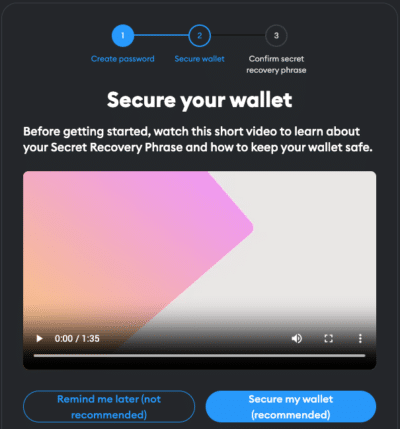
5. Confirm recovery phrase: Finish the setup process by filling in the missing words.


Info: If your device gets damaged or lost, you won’t be able to access your funds without the recovery phrase. Remember, to store your secret recovery phrase safely and never disclose it to anyone.
Adding Funds to Your MetaMask Account Using the Polygon Bridge
To start using the Polygon network, you need to have some ETH in your MetaMask wallet to pay for transaction fees (gas). To move your ETH from Ethereum (layer 1) to Polygon (layer 2), here are the steps to follow:
1. Connect MetaMask: Open the Polygon Bridge Website and connect your MetaMask Wallet.
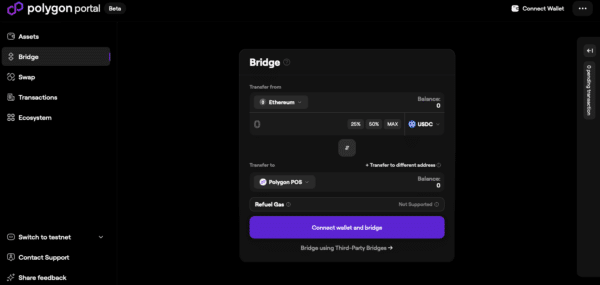
2. Select network: Select the network you want to transfer the funds from to Polygon.
3. Select Assets: Select the token and enter the amount you want to transfer to Polygon. Common choices include ETH, but other ERC-20 tokens compatible with the Polygon network can also be selected.
4. Transfer funds: Check the details and click “Bridge”. This step will prompt a transaction in MetaMask, requiring your confirmation. Be mindful of Ethereum gas fees at this stage, as they apply when transacting on the mainnet.
Info: In order to transfer funds to Polygon, you must have the native currency (ETH in this case) available in your MetaMask wallet. If you don’t currently have any ETH in your wallet, you’ll first need to transfer some to your MetaMask wallet from an Exchange or another wallet.
5. Receive funds: Wait for the network to process your transaction. Once confirmed, You should see your transferred funds available in your wallet on the Polygon network.
FAQ about adding Polygon to MetaMask
How to add Polygon to MetaMask?
To manually add Polygon to MetaMask, open the MetaMask extension, click on the Network dropdown menu and select “Add Network”. Enter the network details for Polygon, including Network name, RPC URL, Chain ID, Currency, and block explorer.
How to add Polygon to MetaMask automatically?
You can add Polygon to MetaMask automatically by visiting Polygonscan and clicking on the “Add Polygon Network” button. This will prompt MetaMask to add the network with pre-filled details.
How to add Polygon to MetaMask mobile?
On the MetaMask mobile app, go to the dropdown menu and select “Add Network”. Choose Polygon Mainnet from the list or go to “custom networks” and enter the same Polygon network details as for the desktop version.
Does MetaMask Accept the Polygon Network?
Yes, MetaMask does accept the Polygon network. Users can manually add both the mainnet and testnet versions of Polygon to their MetaMask wallet.
What Is the Chain ID for the Polygon Network?
The Chain ID for the Polygon mainnet is 137. This unique identifier is used to distinguish the Polygon network from other networks in MetaMask.
What Is the RPC URL for the Polygon Network?
The RPC URL for the Polygon mainnet is https://polygon-rpc.com/. This URL may be updated, so it’s advisable to check the latest from official Polygon resources.
Conclusion
Integrating the Polygon network with your MetaMask wallet expands your blockchain capabilities, allowing for cheaper, faster transactions and access to a broad ecosystem of decentralized applications. Due to the multitude of applications and operations, effective management and tracking of crypto assets is crucial. CoinTracking offers a comprehensive solution that covers everything from portfolio management to tax calculation.


